Integration: RR Domain Reverse proxy
Overview
The Context and Challenge with the Current Setup
By default, the Omnichannel Personalization platform uses a JavaScript library to power client-side integrations where P13N.JS and client.JS are instrumented inside the customer’s client-side codebase. These assets are hosted on the Algonomy private cloud and use the RichRelevance sub-domain, to facilitate API calls from your website.
However, some privacy features-enabled browsers tend to block requests to the RichRelevance sub-domain as they are considered to be cross-origin requests. This creates a challenge for customers when shoppers decide to use a browser with their privacy features turned on or in incognito mode.
API-Gateway as a Reverse Proxy
Setting up a reverse proxy on the customer’s setup can overcome the challenges explained in the introduction section, when the shopper decides to use a browser with privacy features turned ON or in incognito mode, where some of the requests made to and from the RichRelevance sub-domain are getting blocked.
The following sections explain how a reverse proxy solution can be set up using services provided by AWS cloud.
This solution can be set up with any vendor solution, but AWS services (mentioned in the subsequent sections) are taken as an example. The services that will be referenced in the sections are the following.
- API gateway: This service will be the core of the setup to proxy the client request to the RichRelevance domain and render the content back to the client as if the response originated from a server hosted behind you as a customer’s domain.
- Route53 (DNS service): This service will be used to map the customer subdomain to the API gateway generated random URL.
- ACM SSL certificate (SSL certificate management solution): This service will be used to install/apply the SSL certificate on your specific subdomain. All the personalization platform requests from and to the shopper’s browser on your website will be made to this URL, as this will be the shopper facing URL.
As this URL will be hosted on your domain, browsers’ privacy features will no longer block the requests from your shopper’s browser as cross-origin requests.
Note: Any API gateway solution in combination with a DNS and certificate management service can be used to set up a reverse proxy solution at your set up.
Configuring Reverse Proxy
API Gateway Setup
Perform the following steps to set up API Gateway as a Reverse Proxy:
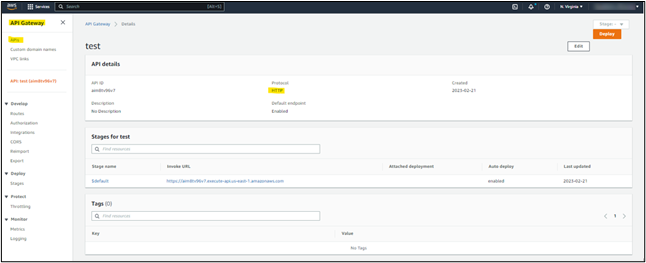
- On the API Gateway console, create an HTTP API with an appropriate name.
- Leave the other options to default, click Next and then click Create.
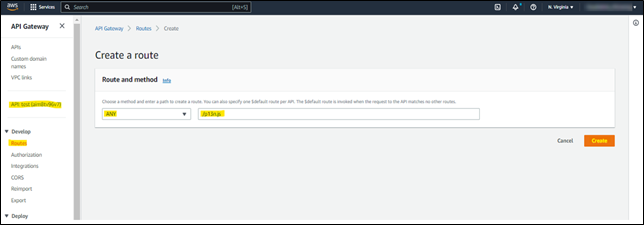
- Select Routes under the Develop section to create a route for your API.
- Here, we are creating two routes: one each for JS and ICO files, which will be rendered from the RichRelevance domain from the Personalization cloud.
- Select ALL for the HTTP method, /p13n.js for Path, and click Create.
- Select ALL for the HTTP method, /favicon.ico for Path, and click Create.
- Here, we are creating two routes: one each for JS and ICO files, which will be rendered from the RichRelevance domain from the Personalization cloud.
Note: You should set up one dedicated route for P13n.js and one for client.js to ensure all Personalization cloud features are configured to work on your sub-domain.
- Select Integrations under the Develop section to integrate routes.
- Select the appropriate route under Attach this integration to a route.
- Select HTTP URI from the Integration type dropdown list under Integration target.
- Under Integration details, provide the Richrelevance URL (https://media.richrelevance.com) with a path that serves the content.

- Leave the other settings to default, and click Create.
- Repeat steps (i) to (iv) to integrate more routes if created.
Creating Custom Domain
As the next step, create a custom domain as the primary shopper-facing domain and apply the SSL certificate already configured on your domain to the newly created sub-domain with your Certificate manager. Perform the following steps to create a custom domain for enduser facing.
- Select Custom domain names in API Gateway service.
- Under TLS, let it be TLS 1.2.
- Under Endpoint configuration, select regional for Endpoint type.
- Select the appropriate SSL certificate specific to the domain.
- Click Create domain name.
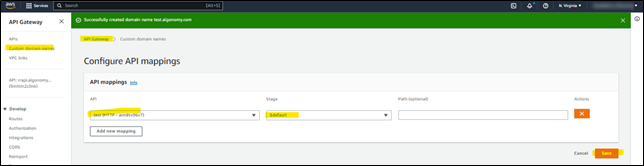
- Under the newly created custom domain, select API mappings.
- Click Configure API mappings and select the appropriate API and default stage.
- Click Save.
- Under the newly created custom domain’s configuration, make a note of the API Gateway domain name for DNS mappings.
DNS mapping
In your DNS service, perform the CName (Canonical Name) mapping of Client custom domain and API Gateway domain name that was configured in the previous sections.
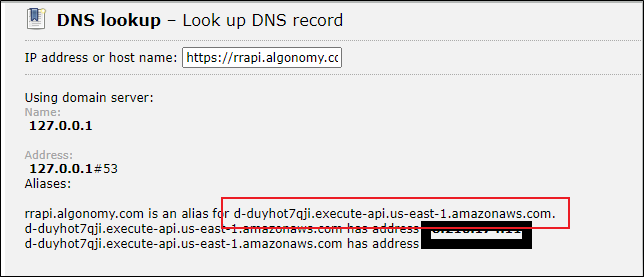
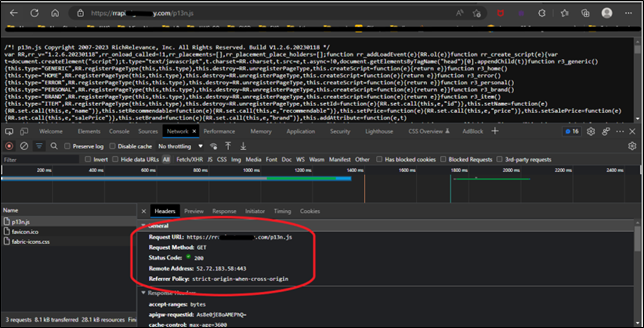
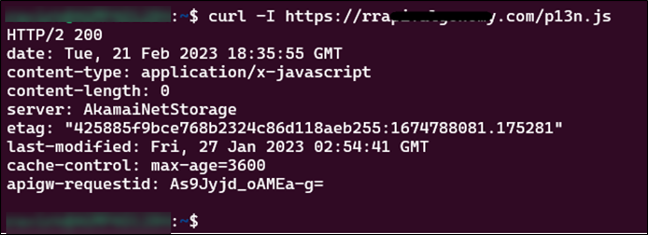
Sanity Test
Once all the configurations are completed, test the functionality of assets loading from your configured domain with an HTTP status code of 200 from content rendered from the RichRelevance domain.
Conclusion
By implementing the reverse proxy solution detailed on this page, customers should be able to take full advantage of the Personalization platform’s capabilities regardless of whether the shopper has turned ON the privacy feature while browsing your website.
In the future, any new features released by Algonomy which depend on instrumenting the latest version of p13n.js or client.js will be automatically available to you, since your client-side code base will always be requesting the content from the Personalization cloud directly.