Getting Started with Ensemble AI
Ensemble AI is a revolutionary merchandising tool that leverages artificial intelligence and data insights to personalize the shopping experience for online retailers. It empowers merchandisers to create and present curated outfits and product collections, saving shoppers time and enhancing their buying journey.
Ensemble AI empowers merchandisers to effortlessly create stunning outfits, product collections, or product bundles.
Leveraging advanced algorithms, we analyze shopping behavior and employ complementary color detection to automatically generate and rank each ensemble.

Key Features
AI-powered ensembles: Automatically generate and rank matching outfits based on shopping behavior, complementary colors, and user preferences.
Personalized shopping experience: Shoppers can discover curated looks that seamlessly match their chosen item, recently viewed products, or general style preferences.
Efficient merchandising: Merchandisers easily define styles, filter products, and generate outfits with minimal effort, saving time and resources.
Data-driven insights: Track engagement, orders, and add-on sales to identify the most successful styles and optimize the products that go well together.
Versatility: Works with both outfits and general product collections, applicable to all retail verticals.
Application Use Cases
-
Fashion apparel and accessories
-
Home decor and furniture
-
Jewelry
-
Sporting goods and equipment
-
Electronics
-
Beauty
-
Any industry with product collections
Value Proposition
Ensemble AI is poised to revolutionize the online shopping experience, transforming browsing into a delightful discovery journey for shoppers and streamlining merchandising efforts for retailers. It empowers your shoppers to discover new looks and simplifies the merchandising process.
Benefits to Shoppers
-
Discover effortlessly: Quickly find complete outfits that match their preferences and save time browsing.
-
Enhanced inspiration: Explore diverse styles and curated looks, sparking new ideas and purchase decisions.
-
Personalized experience: Ensembles are tailored to individual preferences for a more satisfying shopping journey.
Benefits to Merchandisers/Customers
-
Effortless outfit creation: Define styles and generate complete looks automatically, improving efficiency and creativity.
-
Data-driven decision making: Track performance and optimize ensembles based on real-time user behavior.
-
Increased sales: Drive higher conversion rates and add-on purchases through personalized ensembles.
-
Stand out from the competition: Offer a unique and engaging shopping experience that differentiates your brand.
-
Better use of space: Provides shopper with 15 to 20 cross selling options (through 3 /4 outfits) through a single placement.
Challenges Ensemble AI Addresses
Ensemble AI endeavors to tackle the following challenges encountered by merchandisers:
- Shoppers struggle to find complementary items to complete their outfits, which leads to a disjointed shopping experience for the shoppers and missed sales opportunities for merchandisers.
- Manual curation of outfits, which is time-consuming and inefficient for merchandisers.
- Shoppers desire for novel options and their expectation from shopping sites to provide unique styling suggestions, whereas traditional product recommendations are ubiquitous.
- Space optimization for displaying matching cross-selling options.
Enabling Ensemble AI
You can enable Ensemble AI by enabling the build for the Ensemble AI outfit model in the Model Options.
To enable Ensemble AI:
-
Log into RichRelevance portal.
-
Go to Optimization > Model Options > EnableAIModel.
-
Click Enable Build.
The model is enabled.

After the model is enabled, you need to define Ensemble AI outfit by creating styles, after you save the defined styles system generates outfits based on the run schedule, which is currently set to once a day.
Styles Summary, Editing and Enabling
Merchandisers can view the list of already created styles on the Ensemble AI Landing page and perform different action on already created styles.
To edit and enable styles:
-
Log into RichRelevance portal.
-
Go to Optimization > Model Options.
-
On the Models Options page, click the Ensemble AI Model link.

Styles edit and create page is displayed.
Note: If a style is not created, the landing page will not display any style.

Merchandiser can view the following details of the styles:
Name: Name of the style
Number of parts: How many parts are available for a given style.
Date created: Style created date.
Status: If a style is enabled/disabled.
User: User who created the style.
Merchandiser can perform the following actions on the styles:
- Enable/Disable
- Edit
- Delete
Enable/Disable a style
Click Enable toggle to enable a style, or click Disable to disable a style.
Enabling a style allows the style to be part of generating the outfits when the model is run. Disabling excludes the style from generating outfits. Thus, only those styles that are enabled will be part of the outfit generation process.
Editing a style
Click Edit to view and edit the style definition.
You can modify the style name, number of parts, categories/products at each part level, and filters at each part level. When a style is being edited, the 'View Outfits' option is disabled until the style is saved. This is because it requires the model to run once the changes are saved, and it takes some time (until the next scheduled model run) to generate the outfits with the specified changes.
Editing a style is similar to creating/defining a new style, for more information about how to create or define a style, see "Defining and Creating Ensemble AI Outfit and Styles".
Deleting a style
To delete a style, select the style that you want to delete and click Delete Selected.
Deleting a style removes all the ensembles that are generated for that style.
Defining and Creating Ensemble AI Outfit and Styles
What's a Style?
A style is a formal construct within the system that encapsulates the configuration parameters governing the composition and presentation of product selections for a specific outfit or ensemble. It functions as a container or template, defining the following key elements:
Product Quantity: The required number of products to be included within the outfit. This value determines the overall composition and complexity of the presented ensemble.
Product Categories: The specific product categories eligible for inclusion within the style. This allows for targeted selection based on thematic coherence or functional requirements.
Brand Specifications: Any restrictions or preferences regarding the brands from which products can be sourced. This enables brand-specific curation or the promotion of specific partnerships.
Pricing Constraints: The required price range or specific budget limitations applicable to the product selection. This ensures alignment with cost considerations and target demographics.
Product Attribute Filters: Additional criteria defining the desired characteristics of the selected products. This can encompass size, color, material, style, or any other relevant attribute.
By defining these parameters, styles provide a structured approach to generating cohesive and targeted product selections for various outfit presentations within the system.
Creating/Defining Styles
After you enabled the Ensemble AI, the next step is to define/create the ensemble AI outfit styles. Styles are added to the predefined slots, you can associate each slot with some categories or products.
You can also apply filters on top of the product or category selected to include only certain brands, certain price range, and exclude certain subcategories, or even match certain attributes.
Merchandisers can create a new style on the landing page. Creating a new style enables the merchandiser to define which categories/products should be included to generate outfits.
Note: Manually included products are not excluded when you filter, thus, they will remain a part of the outfit generation process.
To define the Ensemble AI styles:
-
On the Models Options page, click the Ensemble AI link.
-
On the Ensemble AI page, click Create new style.

The landing page is displayed.
For more details about the Ensemble AI landing page, see

-
Type a name for the style in the Style name box.
-
Select the number of parts you want to display on your eCommerce site, under No. of parts.
-
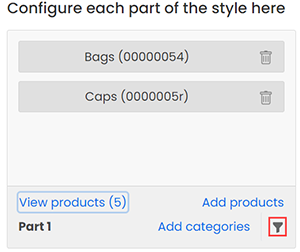
Go to Part 1 and start building the style:
-
To add product categories that you want to display in part 1, click Add Categories.
For each part, you can add a set of categories or specific products that you would like to consider for outfit generation process. Adding a category for a part, allows you to select from the category picker. You can select one or multiple categories.

-
After you selected the categories click Done.
Alternatively, to select categories using category IDs, click Import and add IDs separated by comma.

-
To add products that you want to display in part 1, click Add Product.
-
Search for the product that you want to add, enter the product name or external product Id to search for the product.

-
Click Select to select a product.
-
After you selected the product, click OK.
After the products are selected, they are available in Selected Products tab.

-
-
(Optional) In the respective card, click
 to filter products from the Category you selected for that part.
The below filter window is displayed.

Filters are applied on top of the product or category selected to include only certain brands, certain price range, and exclude certain subcategories, or even match certain attributes.
For more information about applying filters, see
Similarly, set style for other parts.
-
(Optional) Click View outfits to view outfits.
-
Click Save.
Note: After you create a style, the model has to run to generate the outfits. The model runs four times a day.

The model uses all the categories/products chosen as part of the style definition and identifies the products that best match to create ensembles based on inclusion/exclusion criteria defined within the filters, co-occurrence data for views, purchases, category top sellers, Visual AI, complimentary colors, etc. The system identifies all possible combinations of products and generates ensembles for each seed product.
Currently, the model produces a maximum of 10 ensembles for each seed product per style. Each ensemble is evaluated not only against the seed product but also against others within the ensembles.
The model identifies best performing outfits for a given style to generate the outfits and shows them as part of styles placement .
After the outfits are generated merchandiser can:
-
View the outfits and review the outfits for a given seed product.
-
Exclude products or outfits from the generated outfits and can include them back too.
-
View exclusions at the style level or for a particular seed.
Shoppers' View of the Outfits Generated

Applying Filters to Styles at Part Level
At each part level you can apply filters to restrict the products only to the defined filtering criteria.
The filter provides the following options to filter products:

-
Price range: If you want the products to belong certain price range in a part, then select one of the required options from the following:
-
No preference: Choose this option when no price range is to be set.
-
Between: Choose this option to specify a minimum and maximum price range. The system chooses only those products with the specified price range to be part of the outfits.

-
Above: Choose this option to specify the lower price limit. The system chooses only those products that are above this price limit only to be part of the outfits.

-
Below: Choose this option to specify the upper limit. The system chooses only those products that are below this price limit only to be part of the outfits.

-
-
Exclude categories: Specify the subcategories you want to exclude from the selected category.
-
Include brands: Specify the brands for which you want to generate outfits
-
Add attributes: Specify the attribute name and value only for those products that meet the criteria to be part of the outfits.
- Conditional) If you want to specify multiple attributes, click Add+ to add another attribute condition.
